Preheat oven to 180C. Line a cupcake tin.
Add all the dry ingredients to a bowl and mix until there are no lumps. Add all the wet ingredients and mix until smooth.
Divide the batter in your cupcake tin.
Bake the cupcakes for 15-20 min or until a skewer can be inserted and it comes out clean.
Allow the cupcakes to cool in the tin for 10 min then cool on a wire rack. The cupcakes will be very moist when they’re freshly baked but will change when they are room temperature.
To make the frosting, add the cream cheese and butter to a bowl and cream until just combined. Add the sugar and mix until just combined. If you overmix the frosting, it will become loose and may not hold up. Add more icing sugar for a firmer frosting.
Pipe or spread the frosting on the cooled cupcakes.
Notes
- If your chia seeds aren’t ground already, add them to a blender with all the wet ingredients and blend until there are no more whole chia seeds.
- Alternatively, you can use ¼ cup beetroot powder with an extra dash of milk.
Vanilla chia cake
Preheat oven to 170C (fan forced). Line or grease 3 x 20 cm cake tins.
Add all the dry cake ingredients to a large mixing bowl or stand mixer. Mix until there are no big lumps. Add all the wet ingredients and mix until there are no more lumps of flour. Allow to sit for 10 minutes to allow the chia seeds to thicken up.
Divide the cake batter into 3 cake tins. Bake for 20-25 minutes or until a skewer can be inserted into each cake and it comes out clean.
Set aside to cool. Chill the cakes in the fridge for at least 1 hour or overnight (they’re easier to handle when chilled).
Raspberry chia jam
Add all ingredients to a bowl. Mash the raspberries with a fork and mix until combined. Set aside for 10 minutes to thicken.
Cream filling
Add the thick coconut cream and vanilla to a large bowl or stand mixer. Beat until stiff peaks form. Set aside in the fridge.
Coating
Add the chocolate and cream to a medium saucepan over low heat. Mix until melted and well combined.
To assemble
If your cakes have domes, use a large bread knife to slice them off. Snack on the scraps!
Place a cake layer on a wire rack over a large tray. Spread the chocolate ganache on the surface allowing the excess to drip off. Scatter the coconut on the chocolate making sure it’s covered. Chill the cake layer in the fridge and repeat for the remaining layers.
Place one cake layer, chocolate side down on a serving plate. Pipe or spread half of the cream on top. Spread half of the jam on the cream. Place another cake layer on top and repeat. For the final cake layer, make sure the chocolate coconut side is outside.
Chill the cake in the fridge until needed. Leftovers can be stored in an airtight container for 3 days.
Preheat the oven to 180C.
Grease 12 medium muffin moulds with olive oil.
Break the lasagne sheets into 2-3 sections so each section will fit 1 muffin mould.
Boil a large pot of water. Cook the lasagne sheets for 7-10 minutes or until tender. Drain the lasagne sheets and drizzle with oil to prevent sticking.
Gently press the sheets in the muffins moulds and set aside.
Chia béchamel sauce:
Drain the cashews.
Blend the cashews, milk, nutritional yeast and garlic powder until very smooth.
Stir in the chia seeds and season with salt and pepper to taste.
Set aside to thicken.
Tomato filling:
Sauté the onion with a dash of olive oil in a large saucepan over medium heat until golden brown.
Add the pasta sauce and carrot and cook for 10 minutes or until the carrots are tender.
Add the tomatoes, spinach or kale and cook for another 5 minutes.
Season with salt and pepper.
To assemble:
Fill each lasagne cup with about 2 tablespoons of the tomato filling (each should be about ¾ full).
Top with the chia béchamel sauce.
Bake the lasagne cups for 20 minutes or until the top is golden brown.
Cover with aluminium foil or an oven safe tray if the lasagne sheets are burning or crisping too quickly.
Serve the lasagne cups warm with a side salad or steamed vegetables
Add all ingredients to a bowl and mix well, then heat in microwave for 1 minute.
Remove from microwave and mix then taste. Heat more if needed.
Stir before and after cooking
Caution – oats will be hot after cooking
Add all ingredients to a bowl and mix well, then heat in microwave for 1 minute.
Remove from microwave and mix then taste. Heat more if needed.
Stir before and after cooking.
Caution – oats will be hot after cooking
With extra spare time because of social distancing and restrictions, more people are embracing Iso-baking or Iso-cooking. At the same time, spending extra time at home means we are taking notice of things around the house that we otherwise normally wouldn’t notice, such as the amount of waste we are producing.
Did you know that Australians discard up to 20% of the food we purchase? That equates to 1 out of every 5 our grocery bags! This makes us ask the question “how do we minimize our waste?” In our previous blog ‘Waste not, want not’, we have suggested:
- Connect with your supply
- Know what you’ve got in your fridge and pantry
- Store (and eat) your leftovers
- Get creative with your food
Thankfully, there are organisations like Foodbank Australia who fight hunger by working with entire the food industry including farmers, wholesalers, manufacturers and retailers to source food donations and distributed to food relief programs. While this is happening on a greater commercial scale, it has left some asking – how do we contribute to helping our community directly as an individual?
OLIO has stepped in as a solution. The OLIO app was founded in England 2014 and their mission is to connect neighbours with each other and with local businesses so surplus food (and other things) can be shared and not thrown away. What better way to help a neighbour out while also making sure less waste is ending up at landfill, and all at the convenience of your fingertips? Alternatively, if you are struggling during current times, you can even request household items you may need!
But of course, with safety in mind, no-contact pick ups are encouraged during the current pandemic.
If you have some left-over banana bread from a big-bake session, or an unopened jar of pasta sauce nearing expiry that you can’t finish on your own, you can share it with a neighbour in need by downloading the OLIO app from the Google Play Store or iOS App Store!
Photo by Guus Baggermans on Unsplash
On the 29th May, the World Gastroenterology Organisation (WGO) celebrates World Digestive Health Day (WDHD) and we anted to take this opportunity to talk a little about ‘fibre’.
As most of us know by now, our gut health is extremely important to our overall well-being. Our digestive systems take responsibility for the most critical functions of the body’s digestive and immune systems, housing beneficial bacteria that can affect our body’s vitamin and mineral absorbency, hormone regulation, digestion, vitamin production, immune response, and ability to eliminate toxins, not to mention your overall mental health. (1)
The food we eat plays an important role in your gut health. Foods that are rich in fibre also contain a raft of vitamins, minerals and plant-based phytonutrients. Aiming to include whole foods in their most natural state will tick two significant boxes that enable you to meet your fibre requirements and benefit from a range of nutrients that promote good health. One only needs to look at the impressive nutrient profile of the chia seed to appreciate that whole foods can provide a number of key vitamins, vitamins, essential fats as well as fibre.
One of the greatest benefits of adding chia to your diet is that it provides high levels of fibre to help keep your digestive system functioning at its best. As our resident dietician Emma Morris says, “Chia contains the perfect ratio of soluble and insoluble fibre which is needed to keep our digestive system healthy.”
Our resident dietitian, Emma Morris, explains that “soluble fibre forms a gel in water, while insoluble fibre remains close to its original form throughout the digestive path. Both types of fibre are vital for healthy digestion – the soluble fibre helps to moderate blood glucose levels and lower cholesterol while the insoluble fibre provides roughage, clearing out toxins as it passes through the digestive tract lowering the risk of colon cancer”.
Here is a list of our favourite high fibre recipes you can try to show your digestive health some TLC:
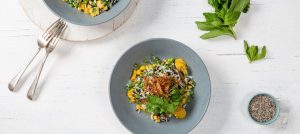
Wild Rice Salad with a Chia Turmeric Cashew Paste
(1) http://www.navacenter.com/community/article-library/browse/2015/06/01/your-body’s-second-brain—the-importance-of-gut-health
Photo by Melissa Askew on Unsplash
Put all ingredients into a blender and purée until smooth.
Serve immediately.
Spread the nut butter across the rice cakes,
Top with sliced banana
Sprinkle over salt, chia and walnuts
Enjoy!
Preheat oven to 150C. In a mixing bowl, mix ingredients until well combined.
Press mixture evenly into a baking dish lined with baking paper.
Bake until granola is golden and toasted, 50-60 minutes.
Allow to cool, cut into bars and serve.
Recipe by: Walnuts Australia
- Pre heat oven at 180°C
- Puree 150g of the tinned apples and dates in a food processor or blender. Stir through cinnamon, ginger, vanilla, chia seeds and milk and set aside for at least 20 minutes until thick and gelled.
- Puree the rest of the tinned apples and set aside
- Place the oats and honey on to a baking tray and place in oven until toasted and golden in colour approximately 15-20 minutes, stirring occasionally. Remove from oven, mix through almond flakes and chopped cashews and allow granola mixture to cool.
- Slice or grate fresh apple
- Once chia seed mixture has gelled and thickened and granola mix has cooled, create a layered affect with chia mixture and apple puree in glass or bowl. Garnish with granola mix and slice/grated apple
Line the bottom of a 15cm spring form cake tin.
Mix all the base ingredients in a bowl. Press into the bottom of the cake tin and set aside.
Blend all the filling ingredients except the chia seeds in a blender.
Mix the chia seeds into the filling and pour into the cake tin. Set aside in the fridge for at least 4 hours.
When the cake is set, remove from the tin, garnish with raspberries and serve.
In a medium size bowl, add water, espresso coffee & chia seeds. Mix well to combine.
Refrigerate for 1 hour.
In serving glasses layer, coffee chia mix, yoghurt, chopped cherries and granola.
Serve immediately.
- Preheat the oven to 180°C. Line the base and sides of a heart-shaped cake or tart tin (we used a 19cmx19cm tin).
- To make the base: add all ingredients to a bowl and mix until combined. If the mixture is dry, add a tablespoon of water and mix until combined.
- Scoop the mixture into the heart-shaped tin. Press the mixture against the sides and bottom to form a 1cm base. Prick the bottom of the base with a fork so it doesn’t puff up in the oven.
- Bake the base in the oven for 12-15 minutes. Set aside to cool.
- To make the filing: Drain the cashews and add the cashews, coconut cream, ¼ cup (60mL) of the coconut oil and sweetener to a blender. Blend until it is as smooth as possible.
- Divide the cashew mixture into two bowls. Add the chia seeds and vanilla extract to one bowl. Add the remaining coconut oil, strawberry jam and beetroot powder to the second bowl. Stir each mixture until combined.
- Pour the vanilla chia mixture into the tart base and smooth the top. Set it aside in the freezer for at least 1 hour.
- When the vanilla layer is dry to the touch, pour the pink strawberry layer on top and smooth the top. Set it aside in the freezer for at least 4 hours or in the fridge overnight.
- The filling is set when it is dry to the touch and doesn’t jiggle. Decorate the tart as desired and serve. Store the tart in an airtight container in the fridge for up to 5 days or in the freezer up to 1 month.
* Only use the thick part of cream which has floated to the top of the can. This will happen to coconut cream when has no additives or emulsifiers in it.
Anthea (aka “Rainbow Nourishments”) is a food lover, blogger, recipe developer, food photographer and chef.
Rainbow Nourishments is not just about the kitchen, but her philosophy is about nourishing people on a deeper level because food is about connecting with loved ones and positive memories. It’s about being kind to yourself, others and the environment.
A vegan-friendly smoothie bowl that is fit for royalty!
Vegan Mincemeat
Preheat the oven to 100 degrees Celsius.
Mix all ingredients except the apple juice and chia seeds in a large oven proof dish. Cover tightly with tin foil and place in the oven. Cook in the oven for one hour.
Remove and allow to cool.
Add the apple juice and chia seeds and stir really well.
Transfer into storage container. Store in fridge for up to 2 weeks.
Vegan Mince Pies
Preheat oven to 180 degrees Celsius.
Add the flour, salt, coconut oil and sugar to a food processor and blend until it looks like breadcrumbs.
Add the water slowly one tablespoon at a time until it starts to come together as a ball of dough.
Bring the dough together and turn out onto a floured surface. Roll out to 2-3mm thick.
Using a star cookie cutter, cut out 10 stars.
Place on a lined baking tray. Add a good amount of fruit mince to each star.
Bring the pastry scraps back together and roll out again to 2-3 mm thick.
Cut out 10 star lids and place on top of fruit mince. Seal edges with a fork and brush the top of each pie with plant-based milk.
Cook for about 20 minutes until golden brown
Let cool on a cooling rack. Enjoy.
An irresistible classic family favourite!
1. Bring water to the boil in a saucepan on medium heat. Place a heat proof bowl on top of saucepan.
2. Add dark chocolate to bowl slowly, making sure to stir and allow to semi-melt before adding more. Always make sure to monitor chocolate to avoid burning it.
3. Once all 3 blocks of dark chocolate have been melted place bowl off to the side to cool slightly (be careful the bowl will be hot, make sure to use a tea towel).
4. Whilst the dark chocolate is cooling, grease and line a baking tray with baking paper.
5. Using the same method, melt the white chocolate in bowl over the saucepan of boiling water. Allow to cool.
6. Once slightly cooled, pour dark chocolate into the baking tray making sure to spread evenly to all corners of the tray.
7. Spoon small amounts of white chocolate randomly around tray before “brushing” through dark chocolate to make a paint like effect.
8. Sprinkle chia, buckinis, freeze-dried raspberries and rose petals evenly around the tray on top of melted chocolate.
9. Slice mini Easter eggs in half before placing them randomly onto the bark lightly pressing down.
10. Cover tray with tin foil before placing in the freezer overnight to set.
11. Once set bring out of the freezer and break into chunks using either the handle of a wooden spoon or a knife.
Prepare one 25cm x 25cm square of puff pastry on a clean dry surface.
Using a grater or microplane grate the oranges and 30g of the chocolate over the puff pastry to completely cover and sprinkle over the chia seeds evenly.
Take opposite edges of the pastry and roll them towards each other to meet in the middle. Brush a little egg down the centre to stick the two halves together. Carefully place onto a tray and put in the fridge for at least 30 minutes to chill and harden.
Preheat the oven to 200C/400F.
Remove the roll from the fridge and, using a sharp knife, slice it into 1cm pieces. Lay each piece on a lined baking tray. Brush with the beaten egg. Bake in the oven for 15 minutes until crisp and golden-brown.
Remove the palmiers from the oven.
While palmers are cooling, melt chocolate over a double boiler. To do this add an inch of water to a small pot, bring to a low simmer, sit a metal bowl on top, careful to not have the water touching the bowl, add chocolate to melt. Dip half of the palmiers in the melted chocolate.
Serve and enjoy.
Looking to make a vegan version? Replace the egg with olive oil spray and use vegan pastry sheets and vegan chocolate.
Cut one 25cm x 25cm square of puff pastry on a clean dry surface.
Add tomatoes to a food processor, pulse to a chunky paste.
Spread the tomatoes over the puff pastry to completely cover right to edges and sprinkle over the rosemary and chia seeds evenly.
Take opposite edges of the pastry and roll them towards each other to meet in the middle. Brush a little egg down the centre to stick the two halves together. Carefully place onto a tray and put in the fridge for at least 30 minutes to chill and harden.
Preheat the oven to 200C/400F.
Remove the roll from the fridge and, using a sharp knife, slice it into 1cm pieces. Lay each piece on a lined baking tray. Brush with the beaten egg. Bake in the oven for 15 minutes until crisp and golden-brown.
Remove the palmiers from the oven and serve.
Looking for a vegan swap out? Replace the egg with olive oil spray and use vegan pastry sheets.
Add the chia seeds, milk and syrup to a bowl and mix with a fork. Set aside for 10-20 minutes or until it thickens.
Mix again with a fork making sure there are no lumps. Separate chia pudding in 3 small bowls.
Add matcha powder to one, beetroot powder to the other and blue spirulina to the third bowl.
Mix each bowl until well combined. Crumble the granola bar into small chunks.
Layer chia pudding and granola bar into tall glasses.
Enjoy immediately or store covered in the fridge overnight.
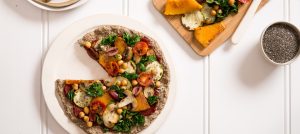
Preheat oven to 180 degrees celsius.
In a food processor add pine nuts and pumpkin seeds. Pulse a few times until coarsely chopped.
Transfer to a mixing bowl and add all other pizza base ingredients. Stir to combine for 2 minutes. Mixture will start to thicken.
Spread out the mixture onto a lined baking tray and press into a round shape, about 1 cm thick.
Bake for 35 minutes or until firm.
Remove from oven and add toppings of your choice and bake for an additional 10 minutes.
Preheat your oven to 180 degrees celsius.
Line a 20cm square cake tin with baking paper.
Prepare your chia eggs by mixing the chia seeds with the water in a small bowl. Leave to set for 15 minutes.
In a large bowl mix together the oat flour, baking powder, salt and almond meal.
Add in the nut butter, melted coconut oil and chia eggs. Mix until well combined.
Transfer 3/4 of the mixture into the cake tin and press down using the back of a spoon.
Bake in oven for 10 minutes, take out and spread the jam layer on top.
Crumble the rest of the base mixture on top then return to the oven and bake for a further 20 minutes.
Let cool completely. Cut into squares.
Add yoghurt, banana, first measure of chia seeds and coconut oil to a blender and blend until smooth.
Pour into serving bowl. Add all topping ingredients arranging as you like.
Tip: Use a frozen banana and chilled yoghurt for a ice cream type texture.
Bring a saucepan to a medium heat.
Add olive oil, prepared leek and garlic. Sauté for 4 minutes or until tender.
Stir in potato and lemon rind. Add stock, along with water, bring to the boil then simmer covered for 10 minutes.
Add broccoli and continue cooking for another 10 minutes. Add spinach and chia seeds to soup, stir through.
The chia seeds will help to thicken soup. Remove from heat and blend well with a stick blender.
Season with salt and pepper. Stir through the lemon juice. Serve topped with chia seeds, hazelnuts and crème fraîche if using.
Place the whole oranges in a saucepan and cover with cold water. Bring to the boil over medium heat.
Simmer for 15 minutes or until tender. Drain. Return to pan and again, cover with cold water.
Bring to the boil and simmer for 15 minutes (this will reduce the bitterness of the peel).
Refresh under cold water. Drain and Let cool slightly.
Coarsely chop oranges, discard any seeds.*
Place the orange in the bowl of a food processor and process until smooth.
Place coconut cream in a chux cloth lined sieve, placed over a bowl.
Set aside to drain and thicken and preheat oven to 170°C.
Brush a round 22cm (base measurement) springform pan with melted butter to lightly grease. Line base with baking paper.
Use an electric beater to whisk the eggs. Slowly add rice malt syrup in a bowl until thick and pale.
Add the orange mix, almond meal, chia seeds, Breakfast Booster mix and baking powder and gently fold until just combined.
Pour into prepared pan.
Bake for 1 hour or until a skewer inserted into the centre comes out clean. Set aside for 15 minutes to cool.
While cake is cooling, discard coconut liquid from bowl and pour in cream from sieve. Use an electric beater and whip until cream consistency is reached.
Serve cake topped with coconut cream and The Chia Co Breakfast Booster.
Eat within 2 days.
*this process can be done the night before to save time if necessary.
Place all ingredients except cherries and chocolate chunks into a good quality food processor and blitz until the mixture is sticky and all dates are completely broken up.
Add dried cherries and chocolate chunks.
Blitz again until mixture is well combine.
Press tablespoon sized amounts of mixture together between your fingers.
Roll into balls. Place into the freezer to set for an hour.
Preheat oven to 180 degrees Celsius.
Place all prepared vegetables in a roasting pan.
Cover in oil, orange juice and salt.
Roast for 35 minutes, turning vegetables occasionally.
Remove from oven when vegetables are cooked through.
Cool slightly, add baby spinach and chopped beetroot leaves, toss.
Add to serving dish and sprinkle with The Chia Co. Salad Booster.
Combine water and chia seeds in a glass and stir.
Let sit for about 15 minutes so that the chia seeds expand.
Stir in the juice of one lemon.
Enjoy!
Whisk all ingredients in a bowl, once combined well pour into microwave proof mug.
Place mug in microwave and cook on medium-high power for 2 ½ minutes.
Optional once cooked pour over 1 tbsp. of maple/ golden syrup or grated chocolate.
Combine chia seeds with milk in a bowl and stir until well mixed.
Leave to rest for approximately 20 minutes.
Meanwhile, place walnuts in a bowl and add enough water to cover and soak, also approx. 20-30 minutes.
Drain walnuts, and place in blender with a little water, approximately ¼ cup water, maple syrup and the matcha powder. Add more water if you prefer the cream to be more liquid. Blend until smooth.
Take a jar and layer the chia pudding and the walnut cream, and top with blueberries.
Serve immediately, or can be refrigerated overnight and consumed the following day for breakfast.
Recipe Author: Chloe McLeod – Dietitian, Co-Owner of Health & Performance Collective, Director of The FODMAP Challenge.
Pre-heat oven to 180 degrees celsius.
Line a pizza tray with baking paper.
To make the base, pour all the dry base ingredients into a large mixing bowl and stir. Add the water and continue mixing until a thick dough forms.
Spread the dough evenly over the baking paper on the pizza tray until a round base is formed. Aim for the base to be about 1cm deep.
Place the dough in the oven to bake for roughly 30-40 minutes or until it begins to firm up and brown.
Pull the base out of the oven and spread with the tomato paste.
Add all the vegetables then top with dried herbs plus salt and pepper to taste.
Place back into the oven to bake for roughly 15 minutes or until the vegetables are cooked through.
Remove from oven and allow to cool for 5 minutes before serving.
Optional additions to serve the pizza with include: nutritional yeast, vegan cheese or standard cheese if you prefer.
Make hummus. (refer to recipe below)
Add spinach and artichokes to small mixing bowl with basil. Mix.
Lightly brush olive oil on one side of bread. In a hot cast iron grill pan, fry sliced bread, oiled side down until golden brown|(2 minutes) being careful not to dry out the bread.
Top toasted side of bread with 2 tablespoon of hummus each.
Top with artichoke mixture. Season with salt and pepper.
Cut in half and serve with lemon wedge on the side.
No Fuss Hummus
In a small saucepan, heat drained chickpeas for 2 minutes.
While chickpeas are still hot add to food processor along with all other ingredients and blend until smooth.
Add a little more olive oil if needed to achieve desired consistency.
Transfer to a jar, drizzle with a little olive oil and seal.
Refrigerate for up to a week.
Note: delicious also with a small handful of grated mozzarella grilled on top.
Preheat your oven to 200 degrees Celsius.
Grate your zucchini and mix in a bowl with the chia seeds then add the olive oil and water.
Add in the seasonings and the corn flour and mix it all together.
Roll the meatballs with your hands and place them on a baking tray lined with baking paper.
Add more water/corn flour if too liquid/dry.
Cook for 20-25 minutes at 200 degrees Celsius.
While the meatballs cook, cook your gluten-free pasta and serve with your favourite healthy gluten-free tomato sauce and a can of diced tomatoes.
Top with the meatballs and vegan parmesan and serve.
Recipe by Claire Power @thehealthyfrenchwife.
Salad
Cook quinoa according to packet instructions. Once cooked, place in a large salad bowl & allow to cool.
Add remaining salad ingredients to quinoa bowl and mix.
Combine dressing ingredients in a small bowl & stir until evenly combined. Pour over salad.
Sweet Potato Mash
Steam sweet potato until soft. Once cooked, put into a blender and combine with chia seeds until smooth. Scoop out & enjoy.
Recipe by Rebecca Gawthorne @nourish_naturally.
Place oats into a blender & blend into oat flour. Pour oat flour into a large mixing bowl & stir in coconut.
Combine water, lemon juice & chia seeds in a small bowl & mix until combined. Add into oat mixture & stir until all dry ingredients are wet. Add dates & lemon rind. Use hands to work mixture until it comes together into a ball.
Scoop out into a baking tin lined with baking paper & press down evenly all over. Refrigerate for a few hours until set.
Once set, lift baking paper out & cut into slices. Enjoy.
Recipe by Rebecca Gawthorne @nourish_naturally.
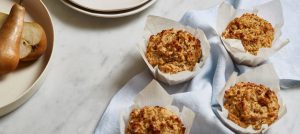
Pre-heat oven to 180 degrees celsius. Grease or place muffin cases into 12 muffins cups.
To make the chia jam, heat frozen raspberries in a sauce pan on low heat until they begin to soften and break down. Remove from heat and stir in 1/2 cup of chia seeds – keep stirring and breaking down the remaining raspberries until the ‘jam’ starts to set – place aside.
Pour all wet ingredients into a food processor, blender until smooth.
Place all dry ingredients into a mixing bowl, stir until combined. Make a well and pour wet batter into the mixing bowl; gently stir to combine, careful not to over mix.
Pour roughly 1 heaped tablespoon of batter into each muffin cup and spread evenly over the base.
Place 1 tablespoon of the jam into the centre of each muffin.
Top each muffin with the remaining batter.
Bake for 25 minutes or until a skewer inserted into the centre comes out clean
Allow to cool on a wire rack before serving. Can be stored in the fridge up to a week or freezer for a month.
By Leanne Ward @the_fitness_dietitian.
To make 2 chia eggs, use a spice grinder to process 2 tablespoon of chia seeds to a flour consistency. Combine with water. Set aside for 10 minutes.
Combine almond meal, protein powder, baking powder and chia seeds in a bowl.
In a separate bowl mash banana, add chia eggs, almond milk and mix well. Add to dry ingredients, combine.
Heat coconut oil in a non-stick frying pan on a medium heat. Add half of batter per pancake.
Cook for approximately 3 minutes, flip and cook until golden on both sides and cooked through.
Top with your favourite toppings.
Preheat oven to 170 degrees, lightly grease a muffin tray with oil.
Mash bananas in a bowl. Add eggs, ground chia and water, whisk briskly until smooth.
Add in all other ingredients except coconut oil and honey, use fork to stir thoroughly.
Melt coconut oil and honey together on a low heat. Add to mixture, stir well.
Fold in raspberries, reserving a few for the top of muffins. Pour mixture into muffin tray.
Top with a few reserved raspberries.
Bake for 45 minutes (pushing the top to test for a nice firmness).
Leave for a few minutes, then remove from tin with a butter knife to cool on a rack.
*use a spice grinder to process chia seeds to a flour consistency.
Preheat oven to 200° C.
Add flour, butter, chia seeds and a pinch of salt to food processor and blend until crumbly.
Add egg and blitz until the mixture comes together in clumps.
Turn mixture onto clean board and knead into round ball. Cover with cling wrap and set aside in refrigerator for 30 minutes.
Place pumpkin, shallots and sage on a baking tray and drizzle with extra virgin olive oil and bake in oven for 20 minutes, or until pumpkin becomes soft and golden brown.
Remove dough from fridge and flatten with rolling pin. Place the dough over a loose-bottomed tart tin and trim the edges.
Blind bake pastry for 15 minutes.
Add feta to pumpkin and shallot mixture and spoon into tart base.
Bake in oven for 20 minutes, or until golden and cooked through.
Recipe by Joel Feren @the_nutritionguy.
Wash and trim the beetroot. Unpeeled, place the beetroot in a large saucepan and cover with water. Bring to the boil, then reduce to a simmer until just tender, about 30 minutes.
Drain pot. Once cooled, peel and cut into chunks. Add to a food processor along with feta. Pulse until combine for a few seconds. Careful not to puree.
Add to base of mason jar. In a small bowl add edamame beans to hot water to thaw. Drain thoroughly. Layer all ingredients in order as mentioned, sprinkling in the chia seeds as you go.
When ready to eat, use a fork to combine base dressing through slightly and enjoy. Or pour into a bowl.
Wash and trim the beetroot. Place the beetroot, unpeeled into a large saucepan and cover with water. Bring to the boil, then reduce to a simmer until just tender, approx 30 minutes. Drain.
Once cooled, peel and cut into chunks. Add to a food processor along with feta. Pulse until combine for a few seconds. Careful not to puree. Add to base of mason jar.
Layer all other ingredients, sprinkling in chia seeds as you go.
When ready to eat, use a fork to combine base dressing through slightly and enjoy. Or pour into a bowl.
Prepare roasted garlic chia guacamole as instructed from recipe. Put 2 tablespoons of mixture in base of mason jar, reserve leftovers in fridge for up to 2 days.
To the mason jar add all other ingredients (except taco) in layers in order as mentioned, sprinkling in chia seeds as you go, squeezing lime juice over top.
In a toaster or under an oven grill, toast taco until hard.Crush and add crumbles and pieces to top of mason jar salad.When ready to eat, shake jar upside down to mix dressing through salad and enjoy. Or pour into a bowl.
1. Preheat your oven to 200 degrees Celsius.
2. Grease donut moulds with some vegan butter (if you don’t have a donut mould you can you a muffin tin).
3. In a mixing bowl, mix the flour, coconut sugar, baking soda and chia seeds together.
4. Add in the nut milk, vanilla, lemon zest and mix it together.
5. Fold in the frozen blueberries.
6. Spoon the batter in the donut moulds almost to the top.
7. Cook at 200 degrees Celsius for 15 minutes.
Recipe author – Claire Power, The Healthy French Wife
1. Cook the couscous as per the packet instructions and leave to cool.
2. In 2 jars, add in the cooked couscous mixed with chia seeds or The Chia Co. Salad Booster.
3. Add in the chickpeas then the falafels.
4. Layer the tomatoes diced and the baby spinach on top of the jar.
5. Top with a few coriander leaves, salt, pepper and chilli flakes.
6. In a separate container to take make the tahini lemon dressing using 2 tbsp of tahini mixed with 2 tbsp of olive oil and 1 lemon juiced.
Recipe author – Claire Power, The Healthy French Wife
Vegan Matcha Loaf with Raspberry Chia Jam
- Pre-heat your oven to 200 degrees Celsius and line a loaf tin with baking paper.
- In a mixing bowl, mix together the flour, oats, sweetener, baking powder and matcha.
- Add in the wet ingredients (nut milk, apple cider vinegar, vanilla) and fold gently together.
- Pour half the batter in the tin and drop some frozen raspberries.
- Spread a layer of chia jam on top and then pour the remaining matcha batter on top.
- Top with extra raspberries.
- Cook for 55-60 minutes at 200 degrees Celsius.
Raspberry Chia Jam
- In a saucepan on medium heat defrost the raspberries until they become soft and juicy or about 5 minutes.
- Add in the maple syrup and vanilla and puree the raspberries with a wooden spoon.
- Once the raspberries are mostly liquid, add in the chia seeds and remove from the heat.
- Pour into a glass container and leave to set.
- Keep in the fridge for a few days.
(Chia jam doesn’t have as much sugar as normal jams so it doesn’t keep as well).
Recipe author – Claire Power, The Healthy French Wife
- Drain and rinse your chickpeas and dry thoroughly with a tea towel to get the chickpeas as crispy as possible.
- Turn on your oven to 220 degrees Celsius and line a small baking tray with baking paper.
- Spread the chickpeas on the tray and add in the olive oil. Coat them evenly.
- Cook for 30 minutes at 220 degrees. Keep an eye on them so as not to burn them.
- Pour into a bowl and coat with The Chia Co Salad Booster.
- Leave to cool down for a few minutes and serve.
This recipe was developed by Claire @HealthyFrenchWife with a child’s flavour preference in mind, but if you want to add some spices she recommends paprika or chilli for an added kick!
Chia Jam Sandwiches:
- Spread a layer of sunflower seed butter then a layer of chia jam on a slice of toast and top with another one. Slice in the middle and enjoy!
Sunflower Seed butter:
- Line a baking tray with baking paper and toast the sunflower seeds for 10 minutes at 200 degrees Celsius or until slightly golden.
- Process the roasted sunflower seeds in a heavy-duty food processor and blend for 5 minutes. Scrapping the sides as often as needed.
- Add in the coconut oil, maple syrup, vanilla and sea salt and continue to process for a few minutes or until smooth. It can take a while to get smooth but keep going!
- Pour the sunflower butter in jar and keep it in the fridge for up to 1 month.
Raspberry Chia Jam:
- In a saucepan on medium heat defrost the raspberries until they become soft and juicy or about 5 minutes.
- Add in the maple syrup and vanilla and puree the raspberries with a wooden spoon.
- Once the raspberries are mostly liquid, add in the chia seeds and remove from the heat.
- Pour into a glass container and leave to set.
- Keep in the fridge for a few days.
(Chia jam doesn’t have as much sugar as normal jams so it doesn’t keep as well).
Recipe author – Claire Power, The Healthy French Wife
Add all ingredients into a jar.
Put the lid on and shake well, until all combined.
Place jar in the refrigerator overnight.
In the morning add desired topping and eat directly from the jar or place into a bowl.
1. Add all ingredients into a jar.
2. Put the lid on and shake well, until all combined.
3. Place jar in the refrigerator overnight.
4. In the morning add desired topping and eat directly from the jar or place into a bowl.
On a medium heat, heat oil in a large wok or frying pan.
Add onion, garlic, ginger and fry, stirring for 2 minutes or until onions are sautéed.
Add lemongrass, kaffir lime leaves, chilli, spices, salt and 1 tbsp of water. Fry, stirring for 2 mins.
Add can of tomatoes, coconut milk and ½ cup of water. Stir until evenly combined.
Add cauliflower and broccoli. Cover and simmer for 10 minutes. Add snow peas, red peppers and chia seeds.
Stir, cover and simmer again for 5 minutes or until broccoli and cauliflower are cooked through.
Season to taste with salt.
Remove from heat, stir through spinach leaves.
Serve with rice, top with suggested garnishes.
Heat a grill skillet on high. Brush corn cob with first measure of olive oil and fry for 10 minutes, turning occasionally. Remove from heat, when cool enough to handle, cut kernels from cob.
Add kernels to a bowl along with chia seeds, diced onion and tomato, stir to combine. Add lime juice and coriander. Season with a pinch of salt. Stir to combine.
Bring the skillet back up to heat. Brush the avocado halves with second measure of olive oil and fry flesh side down in the skillet for 2 minutes until grill marks are dark golden brown.
Place avocado halves on a serving plate and top with tomato, corn, onion mix. Season with salt and pepper. Serve with extra coriander and lime.
Preheat oven to 190 degrees.
Cut off the top of the garlic bulb and drizzle with olive oil. Wrap the bulb in tin foil and bake for 35 minutes.
After the garlic cools, squeeze the roasted garlic out of the cloves.
Add the garlic along with all other ingredients to the food processor and puree until smooth.
Add to serving bowl and enjoy with crackers or crisps.
1. Add all ingredients except Breakfast Booster to a blender and blend until smooth.
2. Divide into 3 serving bowls, garnish with fruit along with a sprinkling of Breakfast Booster. Serve immediately.
Heat a fry pan on high, add cabbage and vinegar. Stir until cabbage is bright in colour and all vinegar has dissolved from pan (about 4 minutes). Remove from pan, cool slightly, and add to large bowl along with black eyed peas, quinoa and carrot.
Put the pan back on heat, add a drizzle of olive oil, garlic and chopped kale. Stir fry kale for about 2-3 minutes or until garlic is fragrant and kale is bright in colour. Sprinkle with a pinch of salt flakes, let cool slightly and add to salad bowl, mix through. Add rocket leaves and mix through.
Add dressing ingredients to a small jar, place lid on tightly and shake. Season with salt and pepper if desired.
Serve salad with dressing and a sprinkling of The Chia Co Salad Booster.
Keep left overs of salad dressing in fridge for up to a month.
Preheat oven to 190 degrees.
Place chopped beetroots and garlic on an oven tray, drizzle with olive oil and roast for 35-40 minutes until tender. Turning once or twice with a spatula.
Once beetroot & garlic cloves are cooked and cool enough to touch, add to a food processor with chickpeas, chia seeds, lemon juice, thyme, water and salt. Blend until smooth, adding more water if necessary.
Add dip to a serving bowl, sprinkle with The Chia Co Salad Booster and garnish with thyme. Serve with crackers.
Enjoy.
Preheat oven to 160 degrees. Put peanuts on oven tray and roast for 20 minutes.
In a small bowl add almond milk, chia seeds and maple syrup. Stir to combine. Set aside for chia to expand for 20 minutes.
In a small saucepan add blueberries. Cook on a medium heat for 4 minutes, stirring occasionally.
Divide mixture between serving jars, set aside.
When peanuts are ready, add to small food processor along with 1 tbsp chia seeds. (Set a few peanuts aside to garnish with later).
Pulse to start with, increasing slowing, then blend on full for 4 minutes* until smooth consistency is reached, stopping a few times to push down sides with a spatula.
*Depending on your food processor this could take anywhere from 2 to 10 minutes.
Give chia pudding a stir and add mixture to serving jars. Top with peanut butter and a few chopped peanuts.
Enjoy.
Using an electric mixer beat first measure of butter, first measure of rice malt syrup and vanilla until pale in colour and fluffy. Add eggs one at a time along with chia seeds, beating well after each addition.
Sift half of the flour into the mixture. Fold in to combine. Add half the milk. Fold in. Repeat with remaining flour and milk. Fold through, careful not to over mix.
Spoon mixture into cake tin and smooth top.
Bake for 20-25 minutes or until a knife inserted comes out clean. Stand in pan for 5 minutes. Turn both cakes out onto a cooling rack and let cool.
Spread a thin layer of jam over both cake evenly. Using a spatula turn one cake onto the other to bring jam layers together. Cut into 15 pieces.
Bring a dry fry pan to a medium heat, add coconut. Toast for 3 minutes or until slightly golden brown. Place coconut in a dish. To make the icing combine second measure of rice malt syrup, cacao, second measure of butter and boiling water in a bowl. Stir until smooth.
Dip each piece of cake in icing on all sides. Dip in coconut on all sides. Place on wire rack over a baking tray and put in fridge for 20 minutes to set slightly.
*search our website for recipe.
1. Preheat oven to 180 degrees.
2. Place cut beetroot on a baking tray, drizzle with first measure of olive oil and roast for 30 minutes, turning once or twice with a spatula, until the beetroot is tender. Once tender, remove from oven and set aside to cool.
3. While beetroot is cooling, place all other ingredients for patties in a large mixing bowl and stir to combine.
4. Place cooled beetroot in a food processor and pulse until all pieces are broken up. Careful not to puree as you want a chunky consistency. Add to patty mix and stir to combine.
5. Divide mixture up into 4. Shape into 2cm patties and place on a lined baking tray. Bake in oven for 30 minutes, flipping over half way through.
6. Place cut sweet potato on another baking tray, drizzle with olive oil, sprinkle with salt. Bake for 30min, or until golden brown. Toss with a spatula half way through.
7. To prepare dressing. Place all ingredients in food processor and process until smooth.
8. Assemble burgers with parsley leaves, beetroot patties, fries and dressing. Enjoy.
*Mix 1 tbsp chia seeds and 3 tbsp water together and leave to sit for 5 minutes. This works even better if you have ground chia on hand. We recommend grinding down a cup of chia seeds and keeping them in an airtight container for future baking and cooking use.
2. Puree the 300g mango flesh in food processor or blender and set a side.
3. Peel and slice fresh mango into strips for garnish
4. Once chia seed mixture has gelled and thickened, create a layered affect with chia mixture and mango puree in glass or bowl.
5. Garnish with sliced mango and coconut chips.
Break up chocolate and add to bowl. Melt chocolate, stirring if necessary. Remove icy pops from moulds and dip the top half of each in melted chocolate. Return to freezer on a feast tray until serving. Enjoy.
Can store for 2 weeks in a freezer proof/air-tight container.
In a food processor blend 1 mango, garlic, ginger and salt. Pulse until pureed.
Place pot over a medium heat, add mustard seeds, dry fry for 2 minutes.
Add mixture from blender along with vinegar, diced onion and diced apple.
Bring to boil. Reduce heat and add sugar, chia and sliced chilli.
Simmer for 20 minutes. Add to sterilised 500mL jar.
Refrigerate. Lasts for 1 month.
Heat oil in a large frying pan over a medium heat. Fry diced mushrooms for 2 minutes, stirring consistently.
Add celery, fry for another 2 minutes.
Transfer to a large bowl, add refried beans, fennel seeds, chia seeds, garam masala, salt and breadcrumbs. Stir until well combined.
Cut two pastry sheets in half. Spoon 1/4 of the mixture lengthwise down each piece of pastry. Roll up tightly.
Cut each roll into 6 pieces, place on lined oven tray. Brush with olive oil, sprinkle with chia seeds.
Bake at 200 degrees c for 30-40 minutes or until golden.
On a medium heat, place 1 tbsp. olive oil in a sauce pan. Sauté the rice for 1 minute and then add 3 cups (300ml) of boiling water. Reduce the heat and allow the rice to cook with the lid on for 7-10 minutes until all the water has evaporated. Once this is done stir and set aside.
In another small saucepan place the wild rice and cover with water, allow to cook for 20-30 minutes until tender, and then drain and set aside.
While the rice is cooking make the turmeric, chia and cashew paste. Place all ingredients in a food processor or blender and process until you form a paste.
Heat 2tbsp olive oil in a fry pan. Sauté red onion and garlic for 2 minutes add fennel seeds and continue until fragrant approximately 2 minutes. Add peas and corn kernels and sauté for a further 4 minutes. Add chicken stock and continue to cook on high for 3-5 minutes until most of the stock is reduced.
Add both basmati and wild black rice and cook until warm through. Remove from the heat and add the chopped mint and coriander.
To serve place a generous amount of the turmeric, chia and cashew paste on the bottom and then the warm rice salad on top, garnish with coriander and crispy shallots.
Mix almond milk, honey, vanilla essence, turmeric powder and chia seeds in bowl and set aside to gel for at least 20 minutes.
Puree 200g blueberries and agave syrup (optional) in food processor or blender.
Roughly chop cashews. Peel and dice kiwi fruit.
Once chia seed mixture has gelled and thickened create a layered affect with the chia mixture and the blueberry puree in a glass or bowl.
Garnish with the extra blueberries, cashew nuts, coconut and kiwi fruit.
Mix milk, honey, vanilla essence, matcha powder and chia seeds in bowl and set aside to gel for at least 20 minutes.
For the honey sesame brittle place sugar, honey, salt and water in a heavy based saucepan on a medium heat. Once melted and bubbling add raw sesame seeds. Cook this until the mixture turns a caramel colour approximately 5-1o minutes, stirring occasionally.
Once a caramel colour is reached remove from heat and whisk in butter until well combined and then add in the baking soda whisking constantly.
Once it is all combined pour onto a lined baking tray and allow the mixture to cool. Once cool crush into small pieces.
Slice kumquats and remove any seeds.
Once chia seed mixture has gelled and thickened and the sesame brittle is crushed, place chia mix in glass or bowl and garnish with honey sesame brittle and slice kumquats.
Heat oil in a non- stick fry pan on a medium heat. Add onion and garlic and sauté until soft (approximately 4 minutes)
Add rosemary, thyme, chilli and cannellini beans and cook for another 5 minutes
Add kale, lemon juice, salt, pepper, chia and veggie stock and simmer for 10 minutes
In another non-stick pan heat 1 tbsp. oil and fry the eggs
Place kale on plate and top with a fried egg
Great for breakfast or lunch with some crusty bread
Slightly warm milk and dissolve drinking chocolate powder.
Add chia seeds, honey and vanilla essence and set aside to thicken and gel for at least 20 minutes
Once gelled and thickened place in glass or bowl and garnish with grated dark chocolate, raspberries and coconut chips
Place Oats+Chia, Cacao+Coconut into a small pot & heat with almond milk.
Stir in mashed banana & cinnamon.
Place oats into a bowl & remaining sliced banana. Top with extra milk & a handful of pecans if desired. Enjoy.
Note – this recipe can also be made into healthy Cacao & Coconut Chia Muffins and Cacao & Coconut Chia Bliss Balls.
To make Cacao & Coconut Chia Muffins, simply place all ingredients in a mixing bowl, mix to combine & bake in muffin tins at 180C until cooked through.
To make Cacao & Coconut Chia Bliss Balls, simply allow cooked mixture to cool. Roll into small balls with hands and coat with cacao flakes.
Waking up to a bowl of this Creamy Cacao & Coconut Porridge with Banana & Cinnamon will warm you up on a cold winters morning & provide your body with essential nutrients to support a strong immune system. Not only does it contain wholesome carbohydrates that act as nutritional immune protectors, but this Creamy Cacao & Coconut oats has the added goodness of chia seeds, which will boost your iron, protein & omega-3 intakes, all of which will help keep you healthy & well this winter.
Recipe and commentary supplied by Rebecca Gawthorne, Dietitian & Nutritionist
Rebecca Gawthorne (aka “Nourish Naturally”) is an Accredited Practicing Dietitian, Accredited Nutritionist & a member of the Dietitians Association of Australia.
Place Oats+Chia Coconut into a mug
Add lemon juice & almond milk. Stir to combine.
Mix in honey and vanilla extract & sprinkle with lemon zest.
Place in fridge overnight & then enjoy.
These Lemon & Chia Overnight Oats are the perfect breakfast for keeping you fighting fit this winter. Thanks to the goodness of chia seeds, just one serve of these delicious overnight oats will provide you with 880mg of omega-3s, which will help your white blood cells function optimally and keep your immune system strong. Plus these Overnight Oats also contain the added benefits of vitamin C from the lemon which has been shown to help reduce the duration and severity of colds and flus. So whip up a batch of these Overnight Oats & keep yourself well this winter.
Recipe and commentary supplied by Rebecca Gawthorne, Dietitian & Nutritionist
Puree peeled ginger and agave syrup in a food processor or blender. In a jug, place honey, ginger puree, lime juice, and chia seeds. Mix well.
Top up with soda water and mix a little and slowly. Garnish with mint.
For the falafels:
Place ½ chickpeas in a food processor/blender and process. Add crushed garlic, diced onion, cumin, coriander, cayenne pepper, turmeric powder and chickpea flour and blend until combined.
Stir through remaining chickpeas and chia seeds. Shape into 10 flattened balls. Heat a little oil (2 tbsp.) in a fry pan and cook until golden on both sides. Alternatively pre heat oven to 200°C and bake for 15-20 minutes until golden.
For the tzatziki:
Place all ingredients into a bowl and mix well.
Serve on pita bread with lettuce, tomato and chopped parsley.
Puree strawberries, 160ml coconut water and 1 tsp honey in a food processor or blender. Stir in 2 tsp chia seeds and set aside.
Puree mango, 160ml coconut water and 1 tsp honey in a food processor or blender. Stir in 2 tsp chia seeds and set aside.
Pour each fruit mixture alternatively into the popsicle moulds to create a marbled affect. Place popsicle sticks in the centre and place in the freezer for no less than 4 hours.
Mix milk, honey, vanilla essence and chia seeds in a bowl and set aside to gel for at least 20 minutes.
On a medium heat in a saucepan place the egg yolks, egg and sugar and whisk until thick.
Add lemon juice and continue whisking until thick again.
Add butter in a cube at a time and whisk until well combined.
Remove from heat and allow lemon curd to cool.
Once chia seed mixture has gelled and thickened and lemon curd has cooled, create a layered affect with chia mixture and lemon curd in a glass or bowl.
Garnish with toasted flaked almonds and pitted cherries.
In the past few years, sugar has eclipsed fat as the ultimate villain on the health scene. And it’s not without reason – as well as a long list health problems caused by high-sugar diets, the prevalence of this substance in almost everything we eat or drink is frightening. The average American consumes 126g of sugar every day – five times the recommended daily intake. And the stats aren’t much better for us in the UK or Australia, either.
We are firm believers in a healthy, balanced approach to nutrition, and we know that eliminating sugar altogether isn’t achievable for most people. Luckily, not all sugars are created equal. While you should still try and keep your daily intake to less than 25g per day, swapping out refined sugar for more natural sweeteners is a positive step in the right direction.
Here’s some of our favourite ‘better for you’ sugars:
Stevia – A herb originally from South America that has been used as a sweetener and medicinal herb in various cultures around the world for centuries.
Why we like it: It is naturally very sweet – 100 to 200 times sweeter than sugar – but it doesn’t raise blood sugar levels like sugar and other artificial sweeteners do.
However… Stevia has the strange bitter aftertaste that many people don’t like and can make it not suitable in a lot of recipes.
Raw Honey – the unprocessed sweet liquid that honeybees produce from the concentrated nectar of flowers.
Why we like it: Honey is only about 30% glucose and less than 40% fructose.There are about 20 other sugars in the mix, many of which are much more complex, and require more energy to break down. This means you end up accumulating fewer calories from it. Raw honey also contains varying small amounts of minerals like zinc and selenium, as well as some vitamins. It also has proven natural antibacterial, antiviral and antifungal properties
However… Any of the minerals and vitamins you might get from honey are destroyed with heat, which means these benefits become void if you’re using honey in your baking, or adding to hot cups of tea.
Coconut Sugar – made from the dried sap of coconut trees
Why we like it: Coconut sugar has a low-GI, with has much less blood-sugar-spiking fructose than most other sweeteners. It contains B vitamins, potassium, chloride, and other vitamins, minerals and enzymes that aid in slower absorption into the bloodstream.
However… Coconut sugar is very high in calories (same as regular sugar), and you’d have to eat a significant amount of it to benefit from any of the above nutrients.
Real maple sugar – made from the sugary sap of maple trees, used for many centuries in North America
Why we like it: a naturally sweet treat that is packed with more minerals than honey. Real maple also contains antioxidants that may even ward off cancer and heart disease.
However… Even though maple syrup does contain nutrients and antioxidants, it is also very high in sugar and has more calories than cane sugar.
Date Sugar – finely chopped dried dates
Great because: An unrefined natural sweetener, with no processing whatsoever, allows for retention of dates’ natural fibre, tannins, flavonoids, vitamins and minerals.
However… Date sugar has a high-GI, and higher fructose percentage that other natural sweeteners. Overconsumption of fructose has been linked to liver problems and weight gain.
Who knew that those wild nights spent air drumming your way across your living room could actually pay off? And who knew that working out could be so much fun?
If you’ve ever dreamed of being a rock star, and if you need loud music and excitement in your fitness regime, POUND® could be just the right workout class for you.
What is it?
Founded in 2011 by two female drummers, POUND® now has over 8,000 instructors, teaching in various gyms and studios, worldwide. It’s a fast, fun full-body cardio jam session, combining light resistance with constant simulated drumming. The 45-min workout fuses cardio, Pilates, Isometric movements, plyometrics and isometric poses to strengthen and sculpt infrequently used muscles and drum your way to a fitter physique.
Why you’ll love it:
- It’s fun. POUND® workouts are spent thrashing it out to upbeat tunes with quick movements. There’s no boring repetition or holding positions for extended periods of time, in POUND® you’re constantly challenged to keep up and stay in time – which is great, because it means you really don’t have time to think about the fact that you’re working out. It’s the perfect type of exercise for those of us that get bored quickly.
- It’s effective. Each 45min POUND® workout can burn up to 800 calories. It’s a full body workout, with a lot of the class spent in squats or lunges. The continuous up-and-down movement works a treat on your butt, inner and outer thighs, and core. And while those Ripstix might not feel too heavy to begin with (they’re about 500g each), the constant drumming and variation of speed and arm height means you’ll be definitely feeling the action in your arms, shoulders and chest.
- It’ll make you feel good. As well as delivering a serious physical workout, POUND® will improve your rhythm, timing, agility and coordination. What’s more, studies have proven that rhythmic movements, such as drumming or dancing, can have powerful brain-boosting and stress relieving effects, with associated health benefits including increased focus, boosted immunity, and reducing anxiety and fatigue.
Beginner tips:
Designed for all fitness levels, POUND® provides the perfect atmosphere for letting loose, getting energised, toning up, and rockin’ out! Nearly every sequence in POUND® comes with easy modifications, which makes it a great workout for every fitness level. Dial it up or dial it down to suit you – squat deeper to get a bigger burn, or skip the jumps if you need to take it easy.
Try it out:
POUND® classes are offered at thousands of venues around the world. Find your nearest class on the POUND website
It’s time to dust the cobwebs off those dumbells.
Are you prepared for Halloween? Like, ready to run if you have to?
For most of us, the reasons we work out are a little less dramatic than saving our lives: it makes us feel good, boosts energy, helps relieve stress… and, aesthetics (duh).
But, have you ever watched a chase or fight scene in a horror movie and thought: How would I fare? Could I outrun Jason? Duck from the shredding swipes of Freddy Kruger? Well, friends, we are here to help.
This special Halloween workout is designed to get you physically prepared for whatever you may encounter – be it a gruesome foe, or a new pair of jeans:
SPRINTS
Why: When you have to get away, and get away fast.
Also because… As well as saving your skin, sprints are also a great full body workout. The explosive movement targets your butt, hips, hamstrings, quads, calves and abs. What’s more, short bursts of high-intensity sprinting also boosts your metabolic rate and helps burn fat.
Do this:
- Warm up with a slow jog for five minutes, and some leg stretches.
- Decide on your sprint track – you’ll need about 100m
- Sprint the 100m, and walk back to the start of your track slowly (this is your rest)
- Repeat 6-10 times
Newbie tip: If you’re new to sprinting, start with running at about 50% max speed and gradually increase your speed each round. Aim for six repetitions. If you need to take a longer breather between sprints, that’s ok too.
SQUATS
Why: Ducking to avoid the fatal swings of a knife-wielding maniac.
Also because… Your whole body benefits from squats. Whether you’re doing bodyweight squats or adding extra weight, the movement builds strength in your legs, butt, back, and core. Squats also increase joint flexibility.
Do this:
- Stand with your feet hip-width apart, tummy tight and your shoulders back and down.
- Keeping your head forward and chest raised, sit downwards as if you’re sitting on a chair. Continue to lower down so your thighs are parallel to the floor, with your knees over your ankles.
- Focus on keeping those glutes tight as you push your weight through your heels to raise back up into your standing position.
- Repeat 12 times
Newbie tip: Posture is key. To stop your back from rounding as you descend, let your lower back arch slightly. Once you’ve got the form nailed, try adding light weights with a shoulder bar or by holding a dumbbell to your chest.
CHIN UPS
Why: To get yourself up and over a cliff’s edge or side of a building, out of harm’s way.
Also because… Chin-ups are the original body weight exercise, and they are a great way to strengthen a number of different back muscles, as well as your arms, shoulders, and chest.
Do this:
- Underhand grip on the bar, hands in line with shoulders
- Pull yourself up till your chin is level with the bar, and lower yourself slowly back down
- Aim for five or six, and then rest for a few minutes. Repeat three times.
Newbie Tip: OK OK , we know – chin ups are hard work, especially if you’re new to them. Most of us are lucky if we can get one or two out! To build up your strength, try starting with reduced resistance by using a stretch band, hooked around the bar and under one of your feet. The band gives buoyancy to the movement and gives you the extra lift you need to get up there. You can also try using negative resistance to build strength – start at the top of the movement (use a box or step to get up there) and lower yourself slowly down. A bit of practice with either of these beginner variations will have you well on your way towards proper chin-ups in no time.
MOUNTAIN CLIMBERS
Why: Scrambling your way under a bush or beneath a car to hide from a zombie
Also because… This is another great full body workout that engages a lot of muscles at once (read: more calorie burning bang-for-buck). Mountain climbers benefit muscular and cardiovascular fitness, while also improving flexibility, blood circulation, and overall strength.
Do this:
- Get into a push-up position, with hands directly under your chest, shoulder-width apart.
- Your body should form a straight line from your shoulders to your ankles
- Lift your right foot and bring your knee as close to your chest as you can
- Return your right leg to the starting position, and repeat with your left leg
- Three sets of ten moves (five each leg), with 30sec rest in between
Newbie tips: If you are new to mountain climbers, perform the knee to chest motion slow and steadily, aiming to build up to a faster pace with practice.
Life can get busy, and we can all be thankful for the many ways that food has become faster and easier. Pre-packaged meals and lunch box items are a saviour for most modern families. And, with plenty of healthier options now available in the ready-to-eat aisles, fast food no longer has to mean ‘bad’ food.
But with this growing reliance on ready-made food, we are at risk of creating a generation of non-cookers. For many kids today, the connection between the food they’re eating and the ingredients or processes involved in preparing food, is entirely missing.
Taking the time to get your child involved in cooking and meal prep can go a long way to making sure they develop a healthy approach to eating. Teach your kids how fun easy it can be to make delicious, healthy food for themselves and you might even save them from the ‘2-min noodle’ student diet once they leave home!
What is it, and why do we eat it?
You can try and instill healthy eating habits til the cows come home, but unless you make it real, your kids won’t get on board. Instead, focus on giving your children an education around common ingredients, such as fresh produce, grains, and legumes, and start a family dialogue around what each food type offers nutritionally.
It doesn’t have to be complex, either. Start with a simple guide, such as the ‘two and five’ rule, and explore with your kids how many different fruits, vegetables and methods of preparation they could use to achieve it. Turning a lesson into an adventure is a great way to help those good food habits stick.
A few of our favourite kid-friendly recipes:
We asked one of our favourite healthy foodies, Jemma Gray of The Healthy Journey, to help us put together some delicious, kid-friendly recipes:
- Strawberry and coconut popsicles
- Raspberry bliss ball pops
- Oat and chia pikelets with mixed berry jam
- Nut-free oat slice
Tips for kids in the kitchen:
- Make it hands-on: This isn’t about your child watching while you do all the work. Some tasks might not be suitable for little ones, but wherever possible let your kids get their hands dirty – they’ll find it much more engaging and will be more likely to learn if they’re actively involved.
- Messy is good: Cooking can be messy and, for kids, mess usually means a good time! Try not to restrict the mess making along the way, as this can ruin the fun. But do make sure to involve everyone in the clean-up afterwards.
- Let them do it their way: Try not to overcorrect – this isn’t about right or wrong ways to tear lettuce! Keep it easy and fun by giving a little guidance, without it becoming a boring lesson on technique. It’s also fun to let your kids choose the ingredients they like, and experiment with different flavours. Not sure if banana, tomatoes and cucumber is a good combo? Maybe you should let them try it – you might be surprised!
- Stay safe: We understand it can be scary to see your child wielding a kitchen knife! Use your best judgement on what tasks are appropriate, and take the opportunity to teach safe utensil handling where you can. You can also try out some kid-friendly cooking equipment – – we love Ikea’s SMABIT range.
Squats are an important part of any fitness regime, and not only because they help you look good in jeans! Squats are a functional exercise, which basically means that they are a real-life movement. From crouching down to tend to a fire, to lifting a box of books, us humans have been performing squats since the dawn of time. They’re often referred to as the ‘king’ of exercises, and with good reason.
As seen in:
Nearly every kind of workout includes some squats of some kind. You’ll find both body weight and power squats are a staple in circuit training, CrossFit, strength classes, dance fitness and boot camp style workouts. Yoga and Pilates include several variations of the squat, like the garland and malasana pose, and even ballet and barre workouts include them – plie, anyone?
Why you need to do them:
If you’re looking for a strength exercise that will deliver the best bang for buck, you need to be squatting. The movement targets many different muscle groups – obviously, your quads, hamstrings and glutes (those good-jeans muscles!), but it’s also a fantastic core strengthener. Squats help to increase mobility, improve balance and have even been linked to improved bone density and faster fat burning.
Body weight vs Power Squats
To weight or not to weight… the debate continues. The answer really comes down to personal preference; both body weight squats and power squats (with weights) deliver a fantastic workout. If you’re new to the exercise, it’s best to master the body-weight squat first off: once you’ve got the posture down, you can execute the movement fairly quickly and should aim to get to around 25 squats banged out in a single set. Once you’ve mastered this, try adding weights with either a weighted bar across your shoulders or holding a plate to your chest. With Power Squats, each movement is more intense so you’ll typically perform fewer reps (eight per set, for instance) at a slower rate. At the end of the day, as long as you’re doing squatting of some kind, you’re doing your body a huge favour.
Pro-tips for the perfect squat:
- Stand with feet shoulder-width apart or slightly wider. Your head should be facing forward, with your chest held up.
- Keep your balance by extending your hands straight out in front of you. You can bend your elbows and clasp your hands together if you like.
- Keeping your head forward and chest raised, sit downwards as if you’re sitting on a chair. You want to stop your back from rounding as you descend, so let your lower back arch slightly.
- Continue to lower down so your thighs are parallel to the floor, with your knees over your ankles.
- Focus on keeping those glutes tight as you push your weight through your heels to raise back up into your standing position.
Once you’ve got the basic move down, you can start looking at more ways to improve form and increase resistance. Take a look at the Greatist’s squat how-to for more tips.
Not great for…
When done correctly, squats are brilliant. But if you have mobility issues, such as stiff hip flexors or existing back problems, you might find keeping the correct posture difficult. Best to leave them out if you have any concerns, or check with your doctor. If squats are a no-go, don’t despair – there are plenty of other great exercises that you can do to target the glutes, quads and hamstrings.
The scoop on Dark Cacao – pronounced “KaKaw”
The Dark Cacao in our Chia Pod is the rawest form of what we generally refer to as ‘chocolate’ – simply the powdered form of the cacao bean. Raw Cacao is made by cold pressing unroasted cocoa beans. As opposed to Cocoa Powder which is the more processed, roasted form.
Ours is Fair Trade Certified, which is so important as the cacao industry has a poor reputation for ensuring the fair treatment of the farmers who tend to the beans.
Now for the amazing health benefits:
Healthy Heart & Controlled Blood Pressure
Cacao contain a high level of flavonoids, specifically epicatechin, which has beneficial cardiovascular effects on health. The high antioxidants found in cacao help to maintain healthy levels of nitric oxide in the body that keep our blood pressure under control but if too high can also release toxins. The antioxidants in cacao neutralize these toxins, helping keep our heart beating healthily.
But before you add milk to your cacao take note! Researchers at Harvard University discovered that the addition of dairy milk to cacao, impaired the body’s absorption of the antioxidants.
Good thing we blended our Dark Cacao Chia Pod with pure almond milk!
Happy Mood
There is a valid reason we crave chocolate when we feel down. If you eat the dark kind full of cacao, it contains phenylethylamine, the same chemical that is also released in our brain when we feel loved and well.
Natural UV Skin Protector
Would you have guessed that Cacao could increase your skin’s resistance to UV damage? One study found that feeding high levels of dark chocolate to healthy people over twelve weeks doubled their resistance to UV rays; feeding low levels of dark chocolate had no effect on their resistance. This has been supported by multiple studies, and both attribute high flavanols for the natural skin guard.
The benefits list is a long one, we didn’t even get to reduced insulin sensitivity, protection from free radicals, and improved blood flow. Cacao is also loaded with body craving minerals: iron, potassium, calcium and magnesium.
Needless to say, cacao is a nutrition rich food that you should include in your “eat everyday” list when balanced with other healthy plant based foods.